WebIssues Manual
Version 1.1.2
To change the advanced settings of the server, go to the Administration Panel and click Server Settings. This option is not available in the Desktop Client. Only the system administrator can change these settings.
The Regional Options and Formats groups of options are described in the section called “Regional settings”.
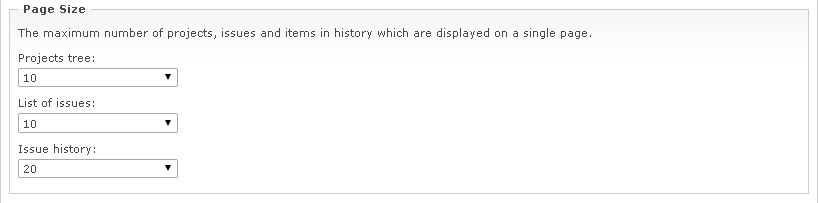
The Page Size group of options allows you to specify the default number of projects displayed on a single page in the projects tree, the default number of issues per page in the list of issues, and the default number of elements per page in the issue history. Each user can choose their own preferred settings using the User Preferences command. These options only affect the Web Client, because the Desktop Client always displays all projects and issues and the complete history without pagination.
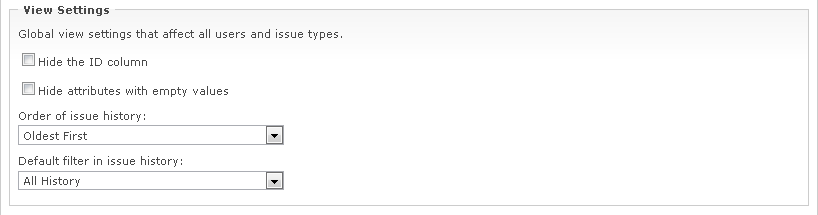
Options from the View Settings group affect all users and all types of issues. When the Hide the ID column option is enabled, the ID column will not be displayed in the list of issues. When you hide the ID column, issues can still be sorted by this column, and the identifier of the selected issue will still be displayed in the Properties group in issue details view. When the Hide attributes with empty values option is enabled, attributes that don't have any value are not included in the issue details view. This option is useful when issue types contain a lot of attributes, which are not always used.
You can select the order in which changes are displayed in the issue history view. Also it is possible to select the default filter in the issue history; you can display all history or just comments and attachments. Individual users may change these settings using the User Preferences command.
You can select the default format of text used for new descriptions and comments. By default Text with Markup is used. You can switch to Plain Text if you prefer text without any formatting like in older versions of WebIssues. Note that individual users may override this setting in their personal preferences, as well as for individual descriptions and comments.

The Enable anonymous access option enables read-only access to public projects without logging in to the Web Client. Note that when you enable anonymous access, all issues, comments and attachments from the public projects become accessible to everyone. The public content can also be indexed by web search engines if the server is accessible from the Internet. Anonymous users can use public views, but they cannot create their own views, use alerts or subscribe to issues. In addition, only registered and logged in users are allowed to add new issues and edit existing issues. Because of this, anonymous access is often used in combination with user self-registration (see below).
Anonymous users won't be able to access anything unless there is at least one public project in the system. For more information about changing project access, see the section called “Project permissions”. For more information about accessing the system in anonymous mode, see the section called “Logging into the system”.

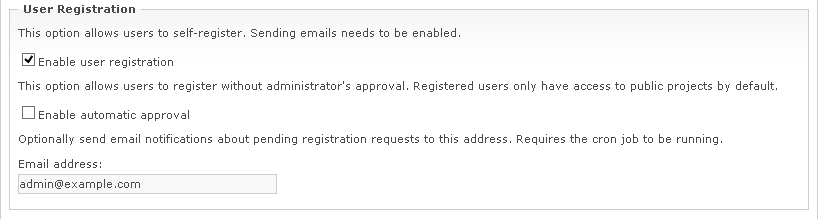
The Enable user registration option allows new users to register themselves in the system. By default, administrator's approval is required before new users can access the system. You can enter an optional e-mail address to which notifications are sent when there are new requests awaiting approval, not more often than once an hour. During the approval, the administrator can assign user's permissions to selected projects. See the section called “Registration requests” for more information about approving registration requests.
If you select the Enable automatic approval option, registered users can log in to the system immediately after their email address is verified, without administrator's approval. In this case, new users do not become members of any projects, so they only have access to public projects. Because of this, automatic approval is only useful if there is at least one public project in the system. For more information about changing project access, see the section called “Project permissions”. For more information about user registration, see the section called “Logging into the system”.
Note
For user self-registration to work, you must properly configure the emails. Sending notifications about pending registration requests also requires a working cron job. For more information, see the section called “Sending emails”.
Options from the Limits group allow the system administrator to specify the maximum length of comments and the maximum size of attachments that can be added by users.

Note
The maximum size of the attachment that can be sent to the system also depends on appropriate configuration of the web server and PHP. For more information, please visit http://php.net/manual/en/features.file-upload.common-pitfalls.php.
By default, small attachments are stored in the database, and large ones directly in the file system. Depending on your needs, you can change the threshold value or force storing all attachments only in the database or file system. The maximum size of attachments stored in the database can be specified in the Attachment Storage group.

Note
Storing large attachments in the database may require appropriate configuration of the database server, and can be less optimal compared to the file system. In addition, many hosting services significantly limit the maximum size of the database, while offering plenty of available disk space. On the other hand, storing attachments only in the database makes it easier to back up the system, since there is no need to back up additional files. In some cases it may also be safer.
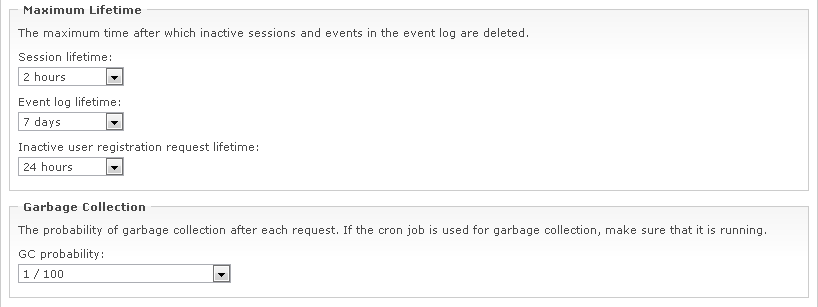
Options from the Maximum Lifetime group allow you to define the time after which inactive user sessions are removed, and the maximum amount of time the entries in the Event Log and the user registration requests that are waiting for email address confirmation are stored by the system. The Garbage Collection setting determines the probability of running the cleanup process, which removes inactive sessions, old entries in the Event Log and unconfirmed requests. Reduce the probability if the server is heavily loaded, or select “Use cron job” if the mechanism of sending email notifications is active (see the section called “Cron jobs”).